
| |
Amiga Emulator FAQ |
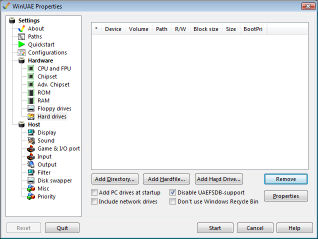
1. Load WinUAE, on Quickstart tab select A1200 or A4000 for the Model and and then click on the Hard disk tab.
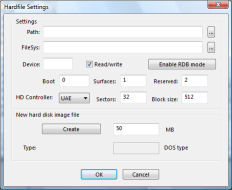
2. Select Add Hardfile and create a new Hardfile. Enter the size in megabytes, for example, 50 for 50MB and click Create.
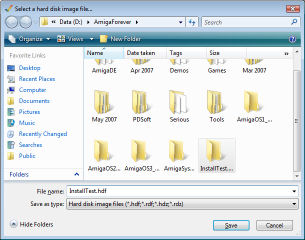
3. Select a location on your hard disk, and enter a filename and click Save. Click OK when done.
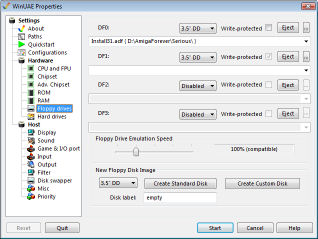
4. Click on Floppy drives, click on ... next to DF0:
and select the amiga-os-300-Install or amiga-os-310-Install disk.
Click Start. If your install disk is not bootable
you can boot from your Workbench disk instead.
If you have Amiga Forever, you can find disks in C:\Users\Public\Documents\Amiga Files\Shared\adf folder.
Insert the other disks when prompted e.g. amiga-os-310-extras, amiga-os-310-fonts, amiga-os-310-locale, and
amiga-os-310-storage, amiga-os-310-workbench.
5. You should now have Workbench loaded with icons for Ram
Disk, Install3.1 and a extra disk called DH0:NDOS (Disk Hard 0:
Non-DOS).
If it has problems with DH0:, click Cancel, type list ram:, assign
env: ram:, loadwb and then endcli to close the AmigaDOS screeen.
Adding a failat 20 command in the startup-sequence can fix this issue.
6. Select the DH0:NDOS icon and goto the menu and select Icons,
Format Disk... Enter a Volume name and tick Fast File System, so it uses the
best file system for hard disks. Click Quick Format as a full format
is not required here.
7. Click Format for continue formatting.
8. Click Fomat again on the second Warning message.
9. You should now have a hard disk called WB3 on the Workbench. You are ready to install Workbench.
10. Double click on Install3.1 icon and double click on Install and select the script to use in your language (in this case English).
11.If the install script finds the hard disk, select Proceed to continue installation. If it asks for ENV:, select Workbench, Execute Command and type assign env: ram: to assign it to the ram disk.
12. Select Install Release 3 to begin installation.
13. Select the installation mode: Novice, Intermediate or Expert user (we will use Novice). Select Proceed with Install.
14. Select a language to use from the list given to install (by default english is selected). Click Proceed.
15. Select which printers to install. Here we have selected
Epson, HP and PostScript printers. Click Proceed. Winuae is designed to
work with PostScript if selected in the Game and I/O Ports tab and
GhostScript is installed.
16. Select which keymaps, for the keyboard layout, to install. Click Proceed.
17. Press F12 and click on Floppy Drives and insert your Workbench3.1 disk. Click Proceed.
18. Press F12 and click on Floppy Drives and insert your Extras3.1 disk. Click Proceed.
19. Press F12 and click on Floppy Drives and insert your Locale disk. Click Proceed.
20. Press F12 and click on Floppy Drives and insert your Fonts disk. Click Proceed.
21. Press F12 and click on Floppy Drives and insert your Storage3.1 disk. Click Proceed.
22. Installation is complete. Click Proceed.
23. Press F12, eject any disks in Floppy Drives and select Reset.
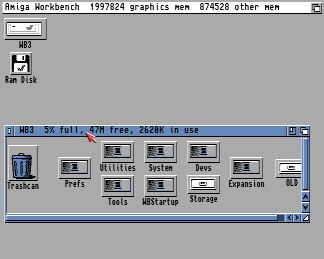
Your Workbench 3.1 installation is ready to use! If you get an AmigaDOS screen
run loadwb to load workbench and copy the startup-sequence file
from your workbench disk in to the S (script) folder.
24. I suggest you copy the Installer program from the
Install disk (see root of the Install3.1 disk) into the C (command) folder
on your new Workbench
disk as it is required for some application installations. It is a hidden file,
so you need to use Window, Show, All Files menu. There are some newer
versions
on Aminet and on more recent versions of AmigaOS.
Expanding Workbench 3.0 or 3.1
25. To make full use of Workbench you need some software to run on it besides the supplied extras and would
recommend the following software:
a) LHA - archiver/unarchiver - Access to software archived with LHA (Self-extracting)
b) XPK Packer/unpacker - Tools to decrunch XPK archives.
c) HippoPlayer - Music and module player.
d) Powerpacker - Library for Powerpacker tools.
e) Classact - Make use of BOOPSI gadget classes like Reaction.
f) IXEmul - Unix emulation libraries
g) UnZIP - Extract Zip files.
h) Magic User Interface (MUI) - Improved interface over Intuition.
i) MUI Unarc - MUI based unarchive tool.
k) ACE Basic - Better version of Basic than Amiga Basic.
l) AmiBlitz - Updated Blitz Basic.
m) ReqTools - Replacement requester library.
n) VBCC - C compiler
o) Web Browser: NetSurf , OWB, IBrowse.
![]() Back to UAE FAQ.
Back to UAE FAQ.