
| |
Amiga Emulator FAQ |
1. Load WinUAE, on the Quickstart tab select A500+ or A600 for the Model and and then click on the Hard disk tab.
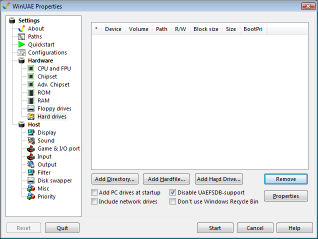
2. Select Add Hardfile and create a new Hardfile. Enter the size in megabytes, for example, 50 for 50MB and click the Create button.

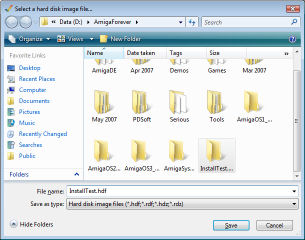
3. Select a location on your hard disk, and enter a filename and click Save. Click OK when done.
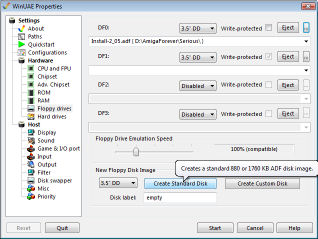
4. Click on Floppy drives, click on ... next to DF0: and select the Amiga-os-204-install disk.
If you have Amiga Forever, you can find disks in C:\Users\Public\Documents\Amiga Files\Shared\adf folder.
5. Make sure the other configuration settings are correct and then click Start.
6. Select 1 to continue to choose a keymap for installation.
7. Insert the amiga-os-extras204 disk into DF1: drie, by pressing F12, click ... next to DF1: and select the Extras disk. Click Retry
8. Click Retry on the Workbench disk and now select the Keymap required (in my case its 8 = GB (British)).
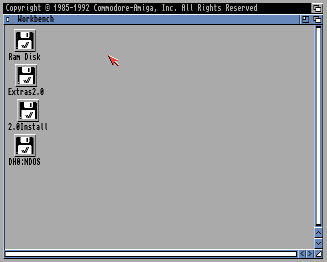
9. You should now have Workbench loaded with icons for Ram Disk, 2.0Install, Extras2.0 and a extra disk called DH0:NDOS (Disk Hard 0: Non-DOS).
10. Select the DH0:NDOS icon and goto the menu and select Icons, Format Disk... Click Continue
11. Click Continue again when asked to 'OK to Format disk in drive DH0:'.
12. Wait for the format to finish, depending on size of disk.
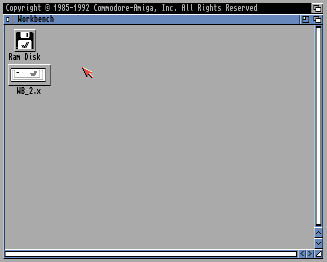
13. You should now have a hard disk called Empty on the Workbench. You are ready to install Workbench.
14. Select the empty hard disk and select Icons, Rename and enter WB_2.x (this can be renamed later).
15. Double click on 2.0Install icon and double click on InstallHD (or use the UpdateWB icon).
15.If the install script finds the hard disk, enter Y to continue installation.
16. Select Y if asked if SYS: is on WB_2.x partition.
17. Change the date if the date shown is incorrect, type N and enter new date in format shown.
18. Select Y to continue installation of Workbench.
19. Press F12 and click on Floppy Drives and insert your Workbench2.05 disk. Click Retry. It will copies files from that disk to the hard disk.
20. Press F12 and click on Floppy Drives and insert your Extras2.05 disk. Click Retry.
21. Press F12 and click on Floppy Drives and insert your Fonts2.05 disk. Click Retry.
22. Select Y if you want the outline Fonts option, if the Amiga has 1MB or more memory.
23. Select Y or N if you wish Workbench to be shown in Interlace. Personally, I would select No.
24. If prompted for the volume Work (this is an extra volume
for documents and programs etc) you can select Cancel, as it will only copy
a disk icon
on to that volume. Installation is complete.
25. Press F12, eject any disks in Floppy Drives and select Reset. Your Workbench 2.x installation is ready to use!
Expanding Workbench 2.0
26. To make full use of Workbench you need some software to run on it besides the supplied extras and would
recommend the following software:
a) LHA - archiver/unarchiver - Access to software archived with LHA (Self-extracting)
b) XPK Packer/unpacker - Tools to decrunch XPK archives.
c) HippoPlayer - Music and module player.
d) Powerpacker - Library for Powerpacker tools.
e) PPMore - Powerpacker More text viewer, better than More tool with WB.
f) AmigaGuide - Read Guide files (see Multiview on later OS').
g) UnZIP - Extract Zip files.
h) Magic User Interface (MUI) - Improved interface over Intuition.
i) MUI Unarc - MUI based unarchive tool.
j) Installer - Newer version of CBM Installer tool.
k) ACE Basic - Better version of Basic than Amiga Basic.
l) AmiBlitz - Updated Blitz Basic.
m) ReqTools - Replacement requester library.
![]() Back to UAE FAQ.
Back to UAE FAQ.