|
Windows 7 Help |
1. How do I change my network setting in Windows 7?
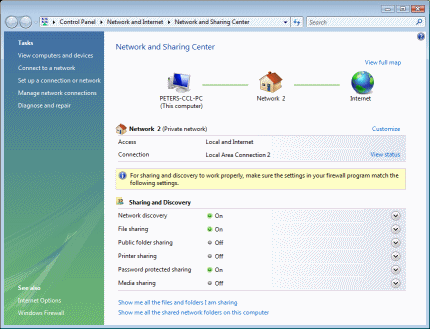
Windows 7 has the Network and Sharing Center where you can view and manage your network settings from one location. To access it, click on the Start menu, select Control Panel, and under Network and Internet select View network status and tasks. Also it is accessible from the Network icon on the start menu.
To change individual network connections such as a Local Area Connection, click on Manage network connections.
2. What do the Sharing and Discovery options do?
a) Network discovery. Enable this option to allow Windows 7 to see
other computers on the network and allow other computers to see the computer.
Click on View computers and devices to display other computers on the
network.
b) File sharing. Enable this option to allow folders and files to be
shared with other computers on the network.
c) Public folder sharing. This allows sharing of the Public folder (i.e.
C:\Users\Public) with other computers. You can specify whether its read only
access or allow users to create or modify files in the Public folder.
d) Printer sharing. This option allows other users to access shared printers
on your computer with other computers.
e) Password protected sharing. This enables only authenticated users
access to shared resources on your computer. To allow guests and any other user,
disable this option. To add users use the User Accounts control panel.
f) Media sharing. This allows other users and media devices to access
music and video files on your computer.
3. What is Internet Protocol Version 6 (TCP/IP)?
IPv6 was introduced first with Windows XP and Windows 2003 to expand on IPv4
to get past the limitation of a maximum of 4 Billion IP addresses using the
old 32 bit system. IPv6 now uses a much longer IP address using Hexadecimal
numbers. Windows 7 will automatically assign an IPv6 address when you configure
your normal IPv4 address. Here is an example of an IPv6 address:
fe80::4490:9230:7194:a69b. You can view the IPv6 address using the IPConfig
tool.
4. How do I enable or configure Windows Firewall?
Unlike Windows XP, the Firewall in Windows 7 can block outgoing and incoming traffic to your computer. To configue it, goto Start, Control Panel, Network and Internet, Windows Firewall. You can add or remove programs allowed through the Firewall by selecting Allow a program through Windows Firewall:
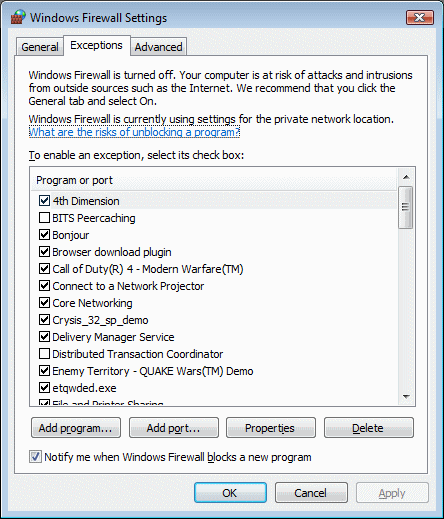
Click on Add Program (or Add Port if you know the port number) and select the program from the list or Browse for the program on the hard disk. If you want to allow the program from your local network rather than the internet, select Properties and use the Change Scope option and use either Any Computer, My network (subnet) or a custom list. If you have uninstalled a program, use the Delete button to remove the program from the Exception list.
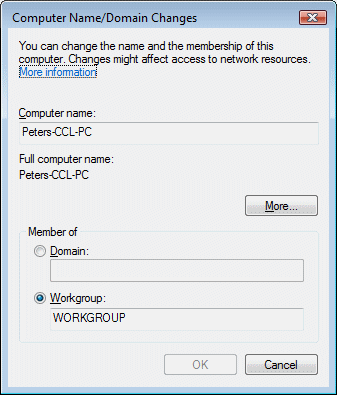
5. How do I change the Computer or Workgroup name?
Windows 7 can use Workgroups or Domains (in Business, Enterprise or Ultimate editions). You can change the computer or workgroup name in Start, Control Panel, System Maintenance, System and click on Advanced system settings. Then select Computer Name tab and select Change.
6. How do I share a folder for other computers to access them?
To share a folder, select the folder, right click it and a pop up menu will appear. Select Share from the menu and the following window will appear.
To set up sharing use the Advanced Sharing to enable sharing and set
the share name and which users can have permission to access files in the share.
You can enable the Sharing Wizard in Windows 7 to make sharing files
and folders easier. See Organize, Folder and Search Options, View menu.
In File Sharing, you can add users (or groups) to share files with as follows:
a) Right click the folder to share, and select Share with..., Specific people
b) Enter the name of user to share with or select user from a list (use Guest to share with anyone), and click on Add
c) By default, the permission level is set to Reader (user can only read files).
d) Change the permission to Read/Write if necesssary.
e) Click Share, the name of the Share is set automatically to the name of the folder.
f) Click
Done.
To remove the share:
a) Right click the folder that is shared, select Share with...
b) Select Stop Sharing.
7. I cannot get Windows 7 to work with shares with other computers such as Windows 2000, XP or 2003?
Windows 7 uses NTLMv2 only by default. You can change it so it can use
NTLM or NTLMv2 by changing the Local Security policy.
Open the Local Security Policy console in Administrative Tools,
expand Local Policies, Security Options and look for Network Security:
LAN Manager authentication level. Change the option from Send NTLMv2 response
only to Send LM & NTLM - use NTLMv2 session
security if negotiated.
If you have the Home edition, then load Regedit and browse to HKLM\System\CurrentControlSet\Control\Lsa
and
change the LmCompatibilityLevel to 1.
Go to Windows 7 in a Domain.